Suggestions for implementation, particularly in one classroom.
Welcome to Episode 33 of Ten Minute Tips to Teach Music. Carousel Teaching – what on earth is it? In its simplest form, it is a cooperative learning strategy that involves movement, discussion and reflection. It is a bit like Gallery Walk (as named by Shelley Gray) where students work on their own to complete a series of tasks around the room or school environment. In a Carousel, they work in small groups and move from station to station.
10 Min Tips To Teach Music Podcast: Episode #33
This type of strategy was quite popular in the 90’s with teachers. Most would use it either at the start of the unit, to assess the students prior knowledge, or it would be used at the end to assess their understanding. Teachers would set up 5 – 7 stations around the room, usually with big sheets of butcher’s paper stuck up on the wall. Students would be divided into small groups and using the given marker, they would walk from station to station, discussing the activity and making their own notes on the butchers paper. At some point in the lesson, the groups would all come back to the centre of the room and the teacher would go through all stations, discussing and validating the notes on the sheets.
Music teachers took this one step further. They would create playing stations or creation stations. Each station would be set up with a practical activity and the students would rotate around the activities. There are various ways to set this up in a space but the biggest struggle was how to do this in one classroom. Obviously with acoustic instruments, it made the problem a little more difficult and the elements of technology were no where near as advanced as they are now.
Recently I went to a school that uses carousel teaching as the sole structure of their entire programming for years 7 to 10. Yes, they have an incredible space that has been purpose built. They took the walls out of a couple of rooms, added a live stage complete with lights, popped in 3 break out rooms that contained band setups allowing for group work, set up single creation stations under headphones and a teacher check in. The students are controlled by a Google Doc that instructs them as to what they are doing at each station and Moodle is where the content is delivered. Pretty amazing set up I must say and suited to their central focus – it’s all about the gig.
When I saw this in action I was impressed and immediately tried the structure with one class in my school. This was during a time when I was exploring different structures that could be delivered in the school. I highly recommend trialling all sorts of new things with one class rather than sitting on ideas and waiting for the right conditions or the start of the year. Choose a class that are flexible and who are able to be honest about the effectiveness of the program and the structure. Classes feel pretty important when charged with the “guinea pig” request and they do take the work very seriously.
Anyway, this was at a time where the room structures and layouts had to to change for they were quite inflexible. Below is a graphic from the Moodle structure I set up. You can see that I created different categories. I divided the class into groups and each group started at the beginning and worked through the activities. I put the instructions in Mission Control. They are below the different elements.
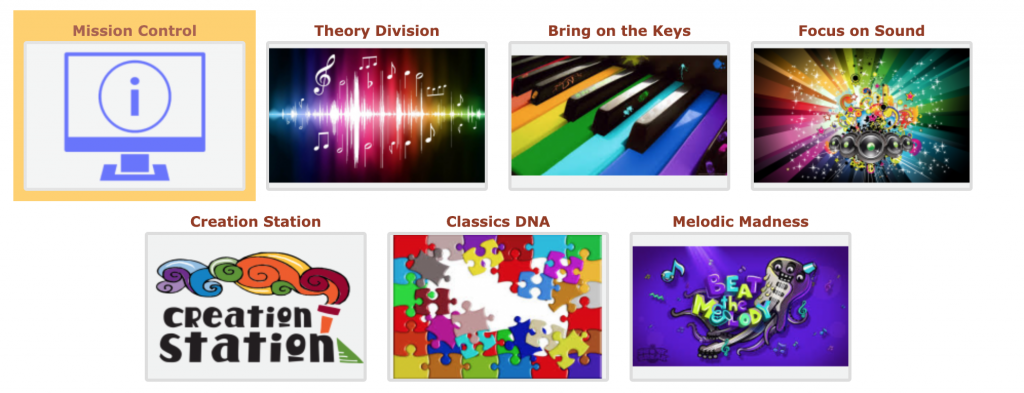
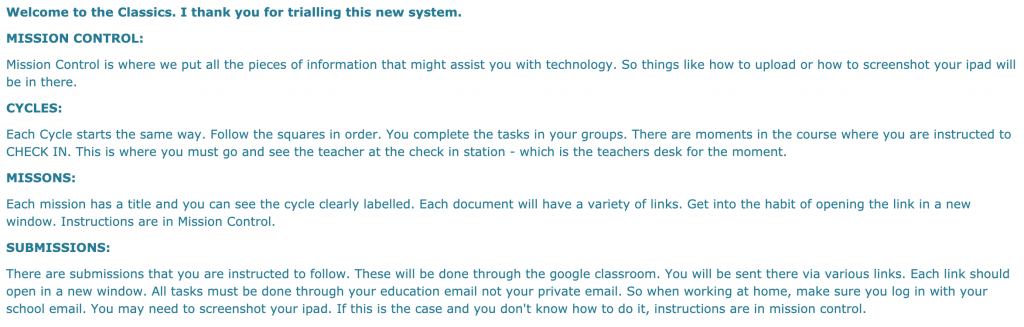
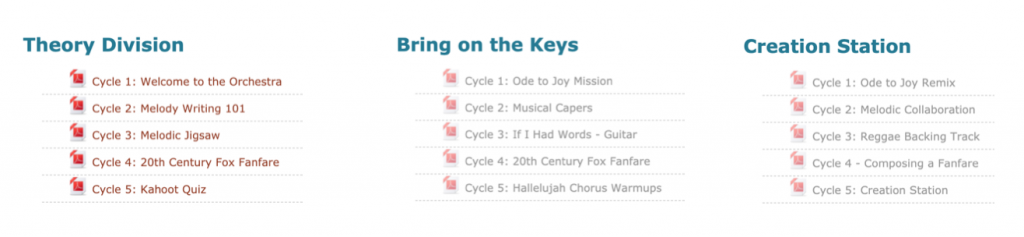
Each graphic contained Cycles so the plan was to complete Cycle 1 before going onto Cycle 2. I had structured it to go in order of the graphics – Theory Division followed by Bring on the Keys etc.
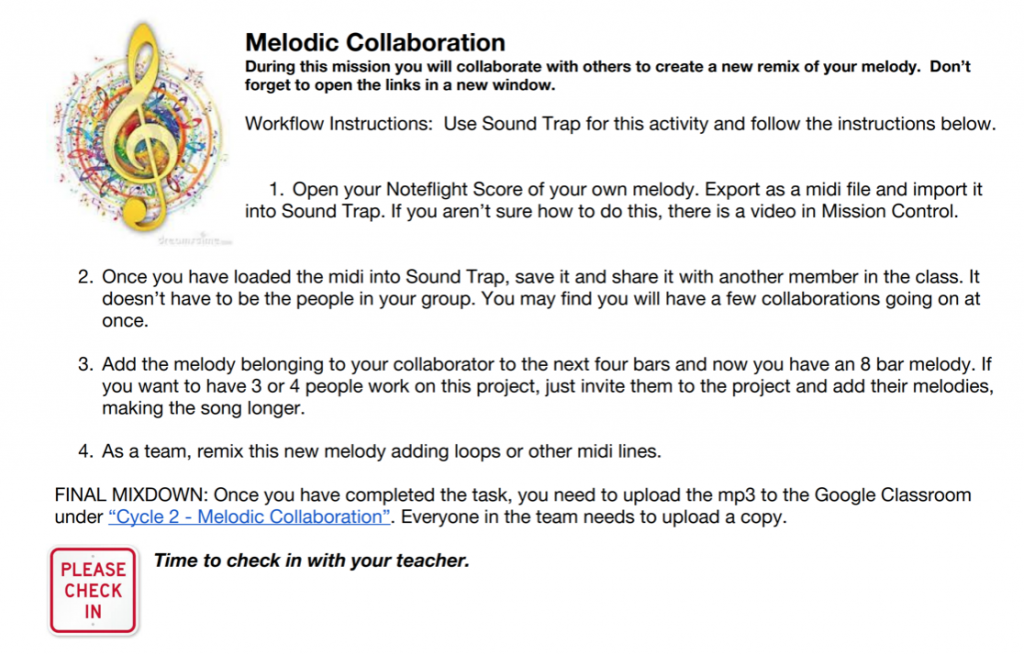
Each cycle had an instruction sheet. The sheet contained all the instructions, complete with hyperlinks to the locations that I wanted the students to use. The students were given a timer to stay on task and if they did not complete the activity, then they had to do it for homework. I used a google doc to monitor progress. Here is a sample of one of the instruction sheets.
Now you are probably thinking to yourself, gosh, this would have taken a heap of time to set up (you are right. It took me a week of my holidays creating the structure, instructions and uploading to moodle). You are also possibly thinking, gee this is impressive if the kids actually got all of this done. Well they mostly did. Of the 6 groups created 4 managed to get everything done to some degree. (At the time, the students had 2 x 38 minute periods a week)
Well the feedback and results were varied. All students agreed the structure was excellent and made everything they had to do incredibly clear. Some struggled with the technological aspects (our wifi was not as strong at the time, we had all sorts of issues with access to the internet etc). Some of the activities were too big to try and complete in the time frame given. (that was the biggest issue with the program) However, the advice from the students was to break them up so that it was more manageable. They liked the collaborative nature of the activities which was a win because one of the focus areas was definitely was to build relationships. They also liked the activities. This was pleasing to hear because creating engaging activities is always a tricky.
After I trialled it with my class, I made some changes and sent it out again, but this time I got one of my colleagues to trial it with a lower ability class. They were no where near as successful. This highlighted the need for further visual support. Many of these students generally struggled with the written nature of all the tasks. There needed to be a lot more teacher instruction to assist the students in their comprehension of the tasks.
Of course, since then, the school timetable has changed and now the students have 1 x 60 minute period a week. Which has its own challenges. We are still trailing a carousel setup but this time, we are putting it into one room and actually setting up physical stations. We plan to set up two electronic stations (using a Jam Hub and the Roland HS-5 Session Mixer), two acoustic stations (Ukelele’s, Acoustic Guitars, iRigs, Egg Shakers and Cahon’s), and 3 independent electric guitar/and keyboard stations. We have flexible furniture and we plan to use fluorescent gaff tape to mark up the spaces on the floor (thank you Greg Thwaites for the idea). I will let you know how it goes.
There is a lot of power in carousel teaching in the music classroom. Don’t be afraid to try it, even if it is with just one class that you think have the self discipline. Remember not all classes need to do exactly the same thing the same way. We have a couple of different setups for content delivery in our programming and sometimes even within the class – some kids will follow one path of content whilst another will travel a totally different road to arrive at the same destination – that’s called differentiation.
In the future, I plan to launch a subscription set up for my resources. As schools and teachers start to move into environments with better technology support, online access to these resources will be advantageous. The plan is to release this carousel package so that you can trial it for yourself. Until next time, have a great day.